We’ve been running Facebook Ads for a Shopify store owner for a few weeks now, but came across a small problem. You see, they sell iPhone cases and they are all the same price so we were roughly calculating our ROI based on the number of conversions displayed within Facebook reports.
So if we saw 60 conversions last week, we just multiplied it by $25 to judge revenue.
But, we realized we weren’t seeing the whole picture.
In fact, the revenue we were driving was higher than we were all assuming because some buyers will purchase 2 or 3 cases during checkout.
So we sought out to figure out how to have Shopify and the Facebook conversion pixel talk to one another so that if one person buys one case, that transaction value is attributed differently than if somebody buys 4 cases.
So we sought out to discover how to dynamically update the conversion value within Facebook reports.
Unfortunately, Shopify does not have good documentation on this.
That’s why we’re writing this!
How to add Facebook Conversion Value to Shopify
Step 1: Generate your Conversion Pixel
Step 2: Place it on your Thank You page by going to:
- Settings
- Then Checkout
- Then Additional content and scripts
Step 3: Modify the code
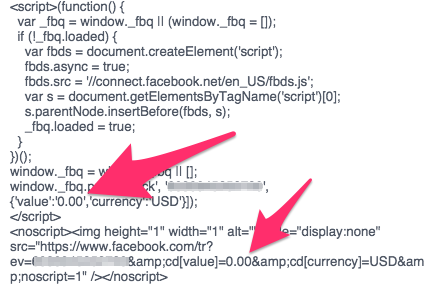
In the code generated by Facebook, you’re going to replace where it says ‘value 0.00’ with this: {{ total_price | money_without_currency }}
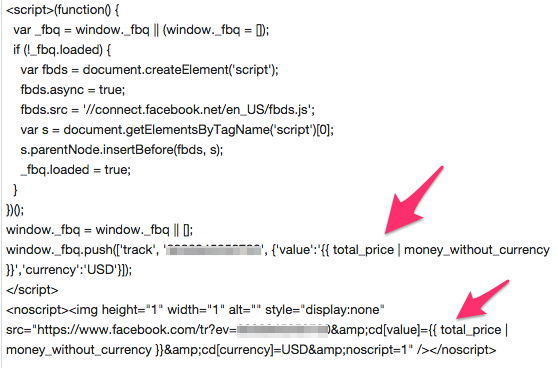
Once you add in the new code, it should look like this:
Step 4: Hit Save!
Now for future transactions, the actual amount a customer spent will be attributed to your Facebook ads.
Need help with your Facebook Ads? We do consulting and full-service management for Shopify store owners like you. Email Ben@Biddyco.com for more info and pricing.